Guide for getting started with DeFi. First you need to install a Metamask Wallet extension to your browser. Then you need to configure some settings if you would like to connect to other blockchains then Ethereum. We give you a guide over how you connect to the the most used blockchains.

Install Metamask Wallet extension
Setup is fairly simple. Here’s a step-by-step walkthrough for setting up your MetaMask wallet on Chrome browser, other supported Browsers are: Firefox, Brave, Edge, Opera.
To install MetaMask, follow these steps:
- Go to the MetaMask website (https://metamask.io/) and click the “Get MetaMask” button.
- You will be redirected to the Chrome Web Store. Click the “Add to Chrome” button to install the MetaMask extension.
- Click “Add extension” when prompted to confirm the installation.
- The MetaMask icon will appear in the top right corner of your browser. Click on it to open the MetaMask window.
- Click the “Create a Wallet” button to create a new MetaMask account.
- Follow the prompts to create a password for your MetaMask account and accept the terms of service.
- Click the “Create” button to create your MetaMask account.
- You will be shown a seed phrase that you should write down, important!, and store in a safe place. This seed phrase is used to recover your MetaMask account if you lose access to it.
- Click the “I’ve copied it somewhere safe” button to confirm that you have written down your seed phrase.
- Congratulations, you have now installed and set up the MetaMask wallet!
General concept Connect Metamask to a Blockchain
By default, you are connected to Ethereum blockchain (“Ethereum Mainnet”), when you have installed Metamask. To connect Metamask to other blockchains, you will need to follow these general steps. We use Polygon Network as an exampel:
- First, make sure that you have the latest version of Metamask installed on your browser.
- Next, open Metamask and click on the “Settings” icon in the top right corner of the window.
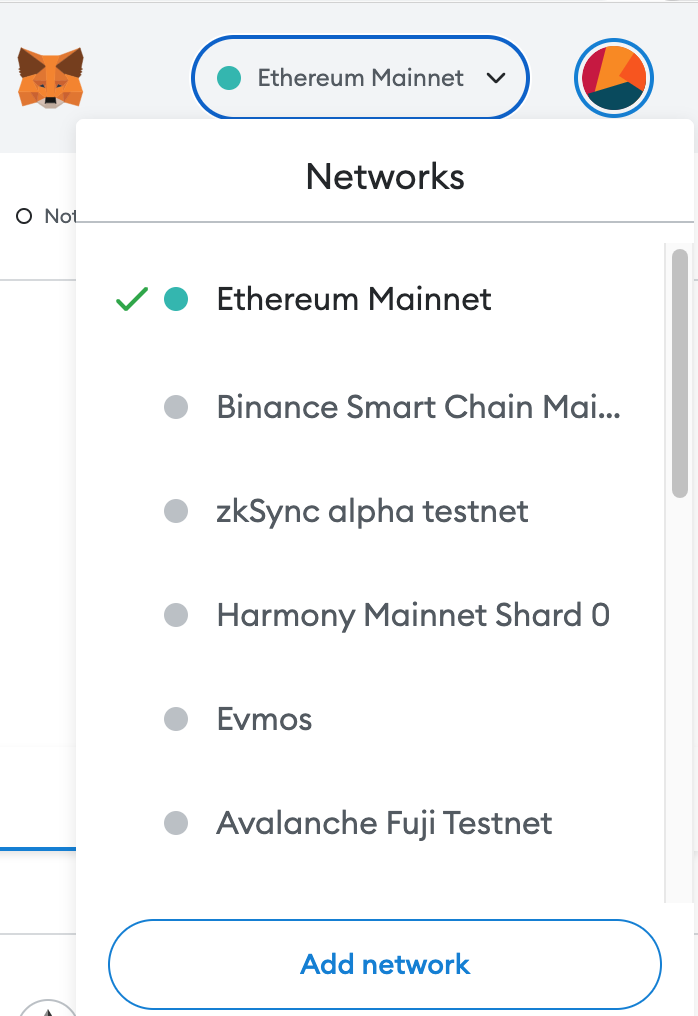
- In the settings menu, click on the “Networks” tab.
- Click on the “Add Network” button at the bottom of the list of networks.
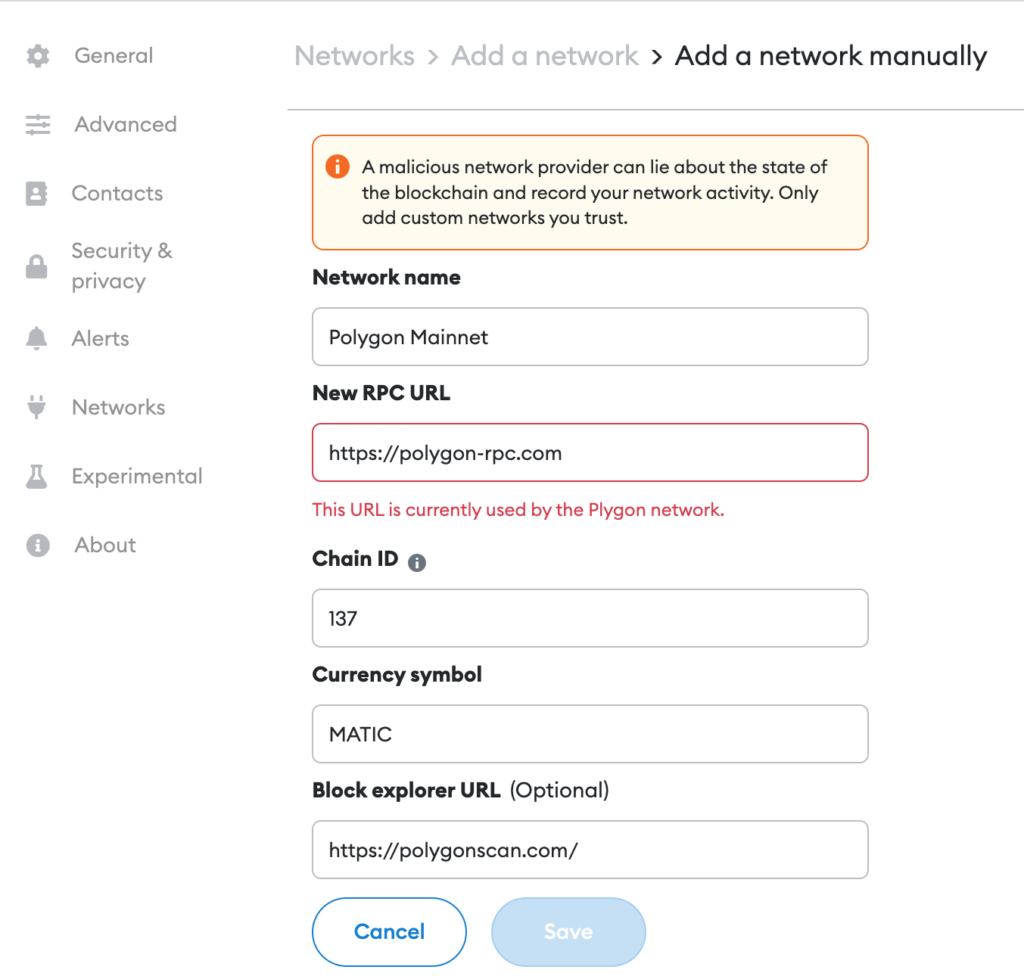
- In the “Custom RPC” field, enter the URL of the blockchain you want to connect to. This URL should be provided to you by the provider of the blockchain.
- In the “Chain ID” field, enter the chain ID of the blockchain. This is also provided by the provider of the blockchain.
- In the “Symbol” field, enter a symbol that will be used to represent the blockchain in Metamask. This can be any string of characters, such as the name of the blockchain or a shortened version of it.
- In the “Block Explorer URL” field, enter the URL of a block explorer for the blockchain. This is a website that allows you to view and search the blockchain for transactions and other information.
- Finally, click the “Save” button to add the blockchain to Metamask. You should now be able to switch between different blockchains in Metamask by using the network dropdown in the top left corner of the window.
Add Network
Configure Network Settings
Connect Metamask to Avalanche Blockchain
To connect MetaMask to the Avalanche blockchain, you will need to follow these steps:
- Open MetaMask in your web browser and click on the “Menu” icon in the top-left corner of the window.
- From the menu, select “Settings”.
- On the Settings page, click on the “Networks” tab.
- Click on the “Add Network” button.
- In the “New Network” form that appears, enter the following information:
- Network Name: Avalanche
- New RPC URL: https://api.avax.network
- ChainID: 420
- Symbol: AVAX
- Block Explorer URL: https://explorer.avax.network
- Click the “Save” button to add the Avalanche network to MetaMask.
- Now, you can switch to the Avalanche network by clicking on the network name in the MetaMask header and selecting “Avalanche” from the list of available networks.
That’s it! You should now be connected to the Avalanche blockchain using MetaMask.
Connect Metamask to Matic Network
To connect MetaMask to the Matic Network, you will need to follow these steps:
- Open MetaMask in your web browser and click on the “Menu” icon in the top-left corner of the window.
- From the menu, select “Settings”.
- On the Settings page, click on the “Networks” tab.
- Click on the “Add Network” button.
- In the “New Network” form that appears, enter the following information:
- Network Name: Matic
- New RPC URL: https://rpc-mainnet.matic.network
- ChainID: 137
- Symbol: MATIC
- Block Explorer URL: https://explorer.matic.network
- Click the “Save” button to add the Matic network to MetaMask.
- Now, you can switch to the Matic network by clicking on the network name in the MetaMask header and selecting “Matic” from the list of available networks.
That’s it! You should now be connected to the Matic Network using MetaMask.
Connect Metamask to Binance Smart Chain
To connect MetaMask to the Binance Smart Chain, you will need to follow these steps:
- Open MetaMask in your web browser and click on the “Menu” icon in the top-left corner of the window.
- From the menu, select “Settings”.
- On the Settings page, click on the “Networks” tab.
- Click on the “Add Network” button.
- In the “New Network” form that appears, enter the following information:
- Network Name: Binance Smart Chain
- New RPC URL: https://bsc-dataseed.binance.org/
- ChainID: 56
- Symbol: BNB
- Block Explorer URL: https://bscscan.com/
- Click the “Save” button to add the Binance Smart Chain to MetaMask.
- Now, you can switch to the Binance Smart Chain by clicking on the network name in the MetaMask header and selecting “Binance Smart Chain” from the list of available networks.
That’s it! You should now be connected to the Binance Smart Chain using MetaMask.
Note: You will also need to make sure that you have BNB in your MetaMask wallet in order to interact with the Binance Smart Chain. You can obtain BNB by purchasing it on an exchange or by earning it through a faucet or other means.
Metamask to Optimism Network
To connect MetaMask to the Optimism network, you will need to follow these steps:
- Open MetaMask in your web browser and click on the “Menu” icon in the top-left corner of the window.
- From the menu, select “Settings”.
- On the Settings page, click on the “Networks” tab.
- Click on the “Add Network” button.
- In the “New Network” form that appears, enter the following information:
- Network Name: Optimism
- New RPC URL: https://mainnet.eth.optimism.io
- ChainID: 1
- Symbol: ETH
- Block Explorer URL: https://explorer.eth.optimism.io
- Click the “Save” button to add the Optimism network to MetaMask.
- Now, you can switch to the Optimism network by clicking on the network name in the MetaMask header and selecting “Optimism” from the list of available networks.
That’s it! You should now be connected to the Optimism network using MetaMask.
Note: The Optimism network is a layer 2 scaling solution for Ethereum, so you will need to have ETH in your MetaMask wallet in order to interact with it. You can obtain ETH by purchasing it on an exchange or by earning it through a faucet or other means.
Connect Metamask to Arbitrum Blockchain
To connect Metamask to an Arbitrum blockchain, you will need to follow these steps:
- Open MetaMask in your web browser and click on the “Menu” icon in the top-left corner of the window.
- From the menu, select “Settings”.
- On the Settings page, click on the “Networks” tab.
- Click on the “Add Network” button.
- In the “New Network” form that appears, enter the following information:
- Network Name: Arbitrum One
- New RPC URL: https://arb1.arbitrum.io/rpc
- ChainID: 42161
- Symbol: ETH
- Block Explorer URL: https://arbiscan.io/
- Click the “Save” button to add the Optimism network to MetaMask.
- Now, you can switch to the Optimism network by clicking on the network name in the MetaMask header and selecting “Optimism” from the list of available networks.
Connect Metamask to Fantom Blockchain
To connect Metamask to a Fantom blockchain, you will need to follow these steps:
- Open MetaMask in your web browser and click on the “Menu” icon in the top-left corner of the window.
- From the menu, select “Settings”.
- On the Settings page, click on the “Networks” tab.
- Click on the “Add Network” button.
- In the “New Network” form that appears, enter the following information:
- Network Name: Fantom
- New RPC URL: https://rpc.ftm.tools or https://rpc.fantom.network
- ChainID: 250
- Symbol: FTM
- Block Explorer URL: https://ftmscan.com/
- Click the “Save” button to add the Optimism network to MetaMask.
- Now, you can switch to the Optimism network by clicking on the network name in the MetaMask header and selecting “Optimism” from the list of available networks.